- 0
- 0
- Days
- 0
- 0
- :
- 0
- 0
- :
- 0
- 0


Description
Rhodium Plated 925 Sterling Silver Finger Ring Components, with Cubic Zirconia, Adjustable, Platinum
Size: about 17mm inner diameter, 2.5mm wide, tray: 9x10mm.
Priced per 1 pc
Please Note: Slight deviations in colors is allowed due to different display device.
Types of Ring Settings
Bezel Cup Ring Settings
Bezel cup ring settings are marked by a thin edge around the bezel, which can help the cabochon stay in place better. They are mainly paired with gemstone or glass cabochons.
The metal edge provides protection for the cabochon, reducing the risk of damage from impacts or scratches.
The sleek and modern design highlights the stunning center cabochon, drawing people’s eyes and creating a captivating visual effect.
Its tray shape mainly comes in round, square and oval. You can select corresponding cabochon through referenced size chart.
How to set a cabochon in a bezel cup setting?
How to set a cabochon
in a bezel cup setting?
-

-
 1. Apply glue on the bezel
 -
 2. Place a cabochon
 -
 3. Finished
How to set a cabochon in a fancy bezel setting?
How to set a cabochon
in a fancy bezel setting?
-

-
 1. Apply glue on the tray
 -
 2. Put a cabochon
 -
 3. Press surrounding prongs against the surface of cabochon with pliers
 -
 4. Finished
How to set a cabochon in a open bezel setting?
How to set a cabochon
in a open bezel setting?
-

-
 1. Apply glue on the bezel frame
 -
 2. Inlay a flat back cabochon (Note: this open bezel must be paired with flat back cabochons)
 -
 3. Finished
-
Plain Pad Ring Settings
Without any block at the edge of the pad, plain pad ring setting can match with some irregular cabochons that are bigger than its pad size.
-
-

How to Use
-
 1. Prepare Material
 -
 2. Apply glue on the plain pad
 -
 3. Set a cabochon according to your wanted direction
 -
 4. Finished
-
Sieve Ring Settings
Characterized with concave and perforated sieve bezel, these ring settings are suitable for soft and flexible ornament accessories. Besides, it is also a wonderful option for you to make a wire wrapping beadwork craft with the multi-hole setting.
-
-

How to Use
-
 1. Thread through center two holes and knot twice at the back
 -
 2. String beads on the front and pass through the next hole (Please note to thread back through the first bead)
 -
 3. Repeat stringing beads and knot with the short thread, trim excess thread
 -
 4. Finished
-
Grooved Ring Settings for Inlay Rings
Grooved ring settings are designed with a groove or channel that runs along the band of the ring. The groove can be simple or complex, with different widths, depths, and patterns.
They can be inlaid with various small decorative objects, such as jewelry chains, sequin, clay, rhinestones, etc. -
-


Four Prong Ring Settings
Featuring with four prongs extended from the base, the settings mainly used with Rivoli rhinestones or gemstone cabochons together . Their prongs can hold ornaments well.
The minimal design can attract more attention on the the center ornament, making your ring more shiny and charming.
Symmetrical four prongs show aesthetic balance and prevent ornaments from becoming loose or falling out.
Though 2 prongs less than 6-prong style, four prong ring settings with good quality are secure enough to hold your gemstone.
Tray shape of our four prong ring settings are oval mostly. You can choose compatible gemstone cabochons according to common tray size as below .


How to Use Gemstone & Diamond Spring Prong Claw Holder?
How to Use Gemstone &
Diamond Spring Prong Claw Holder?
Spring prong claw holders, also known as tension setting rings, are a unique and convenient style of ring setting. They are often used with diamonds or other precious small gemstones. You can press the both sides of the ring inwards to open the claw holder and then grab the diamond.


-
For Half Drilled Beads
This kind of ring setting with a pin is a good buddy for half drilled beads. Its bezel setting protects the bead from damage by providing a barrier around it. Please note that the hole size of the bead you choose should be matched with pin size.
-
-

How to Use
-
 1. Prepare Material
 -
 2. Apply glue on the pin and bezel
 -
 3. Insert a pearl bead onto the pin
 -
 4. Finished
How to Clean Sterling Silver Jewelry at HomeHow to Clean Sterling Silver Jewelry
at Home
It is important to clean your sterling silver jewelry regularly to remove tarnish and restore its shine for long-term use.
-
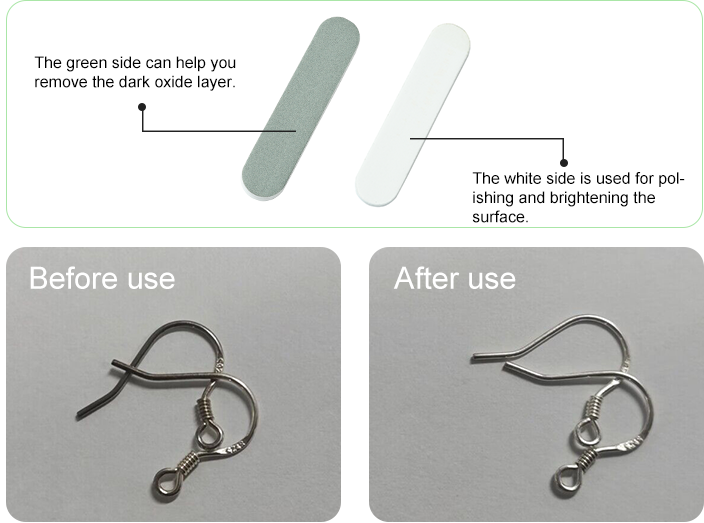
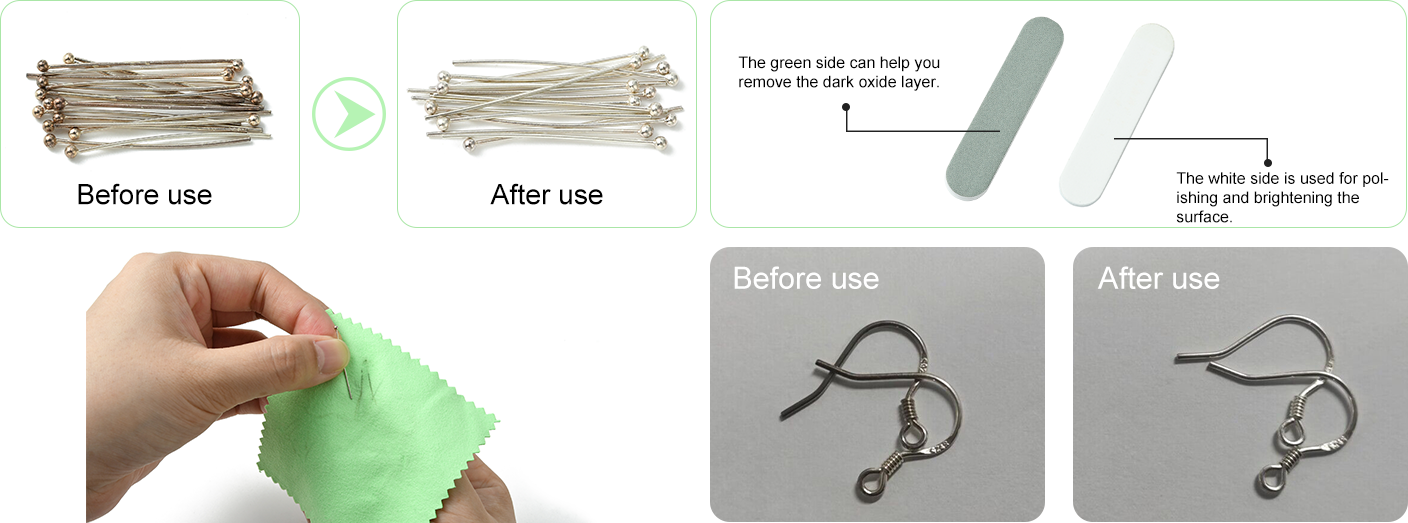
Using Silver Polishing Cloth
Simply rub the tarnished area with a silver polishing cloth until the black residue is completely removed.
-
Using Silver Polishing Sticks
Just rub it gently on the tarnished areas of silver jewelry.

Using Aluminum Foil & Baking Soda & Boiling WaterUsing Aluminum Foil & Baking Soda
& Boiling Water
-

1.Cover the bowl with aluminum foil and place some baking soda along with your sterling silver jewelry inside the foil-lined bowl.
-

2.Pour the boiling water into the bowl and stir for a few minutes.
-

3.Take the jewelry out of the bowl and rinse off any remaining baking soda. Dry it with a soft cloth.
-
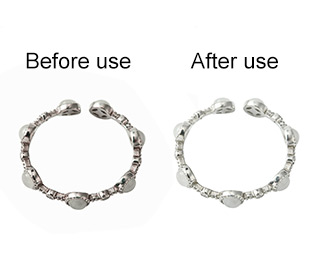
4.Comparative display.
How to Prevent Your Sterling Silver Jewelry from Tarnishing.
Sterling silver jewelry tarnishes easily when it comes into contact with sulfur particles, especially in a humid environment. Therefore, it is important to store it properly.
- ● Shop Rhodium Plated Sterling Silver Jewelry
- Enhance your 925 sterling silver jewelry with our platinum plated collection (also known as rhodium-plated). The rhodium metal layer creates an anti-tarnish coating, allowing for extended wear without worrying about tarnishing.
-
 Chains
  Necklaces
  Finger Rings
  Earrings
  Bracelets
- ● Store in a cool and dry place
- Avoid damp areas like your bathroom, pool, wet basement and attic.
- ● Store individually
- Store your jewelry in an anti-tarnish zip lock bag not only to prevent tarnishing but also to protect it from chemical reactions and scratches when in contact with other metal jewelry.
- ● Keep away from harsh chemicals
- Items such as lotion, hair spray, skincare products, swimming pools, self-tanner, perfume, shampoos, conditioners, hot tubs, hand sanitizer, body washes, etc.
- ● Put on your jewelry at last
- This helps avoid potential contact with skincare products, makeup, hairspray, and perfumes, thereby reducing the risk of tarnishing.
- ● Take it off when doing household chores
- Materials with additional sulfur, such as household detergent, chlorinated water, sweat, and rubber, can speed up the tarnishing process.
- ● Not to wear them in wet place
- For example, your bathroom, swimming pool, or hot tub.
 iOS APP
 Google Play